How to Build a Wall-Mounted NFT Hydroponic System
Build a wall-mounted NFT system that grows 20 to 30 plants on any outdoor wall. Under $150 in materials using PVC pipe, lag screws, and a standard submersible pump.
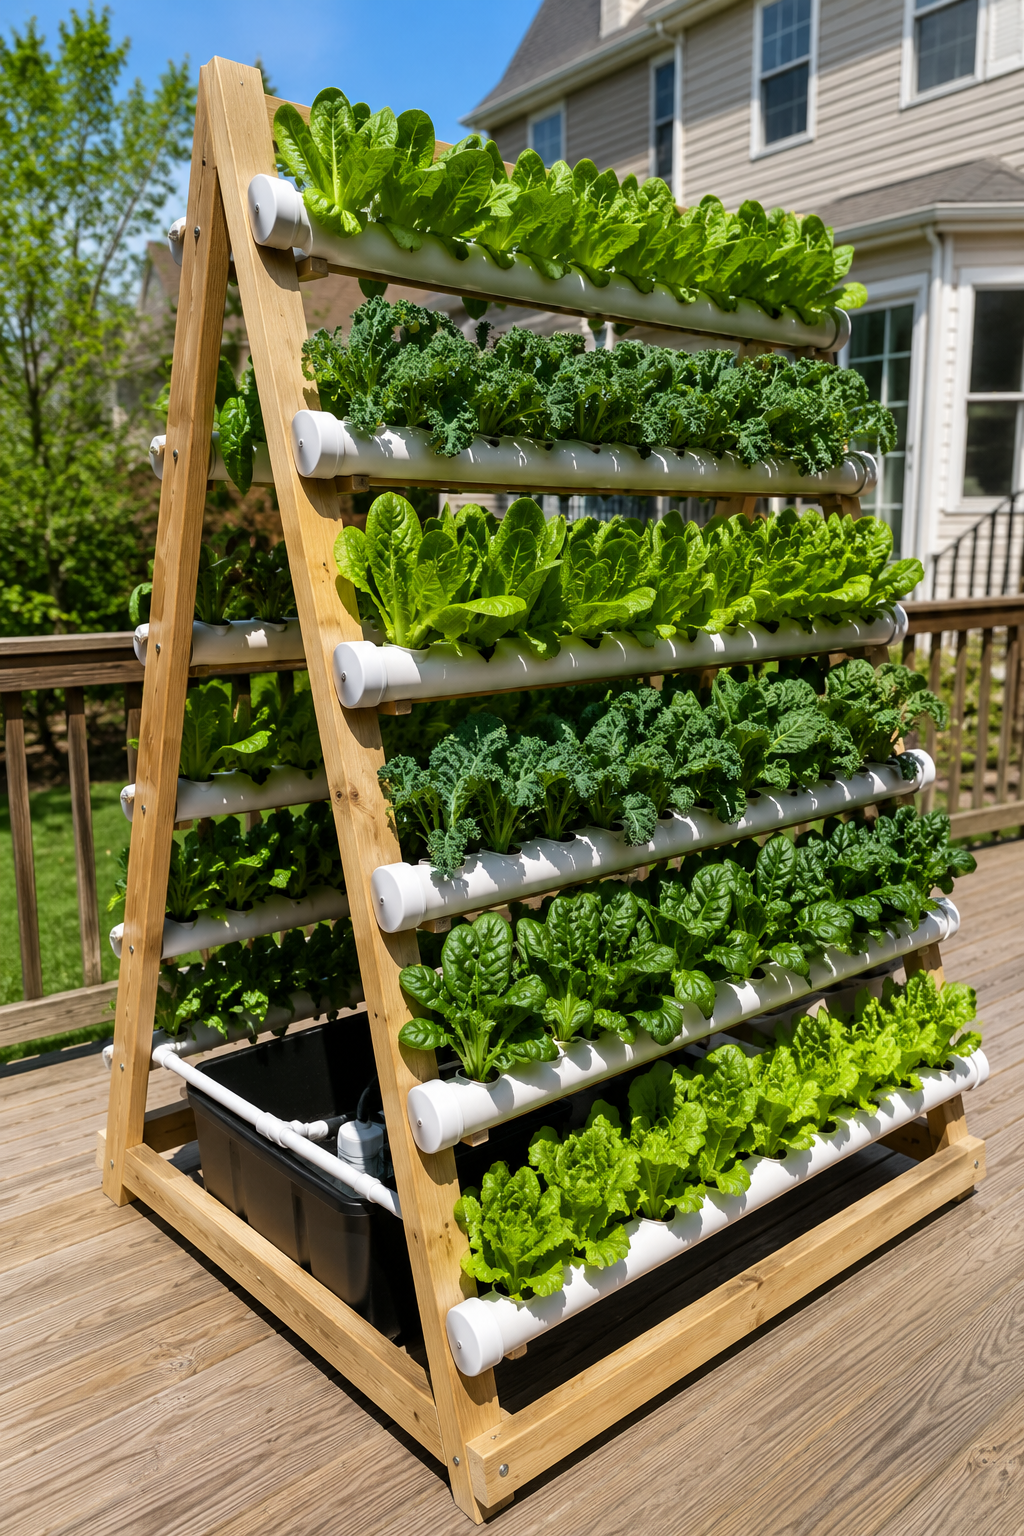
Your empty patio wall grows 20 to 30 plants with a wall-mounted NFT system. Lightweight, continuous-flow, and expandable one row at a time, this is why NFT works where DWC and Kratky cannot. New to soilless growing? Start with the complete hydroponics beginner guide.
The short version
- A 4-row system on 4-foot pipes holds 20 to 24 plants in under 8 square feet of wall space.
- Three details determine whether the build holds: lag screws into studs (not drywall), a quarter-inch slope per foot on every pipe, and 4 inches of clearance from the wall for maintenance access.
- The pump runs 24/7, the thin NFT film dries within 45 minutes of pump failure and roots begin to stress immediately.
- Northern growers (Zone 6 and colder) must drain and store the system before first freeze each fall.
How Does a Wall-Mounted NFT System Work?
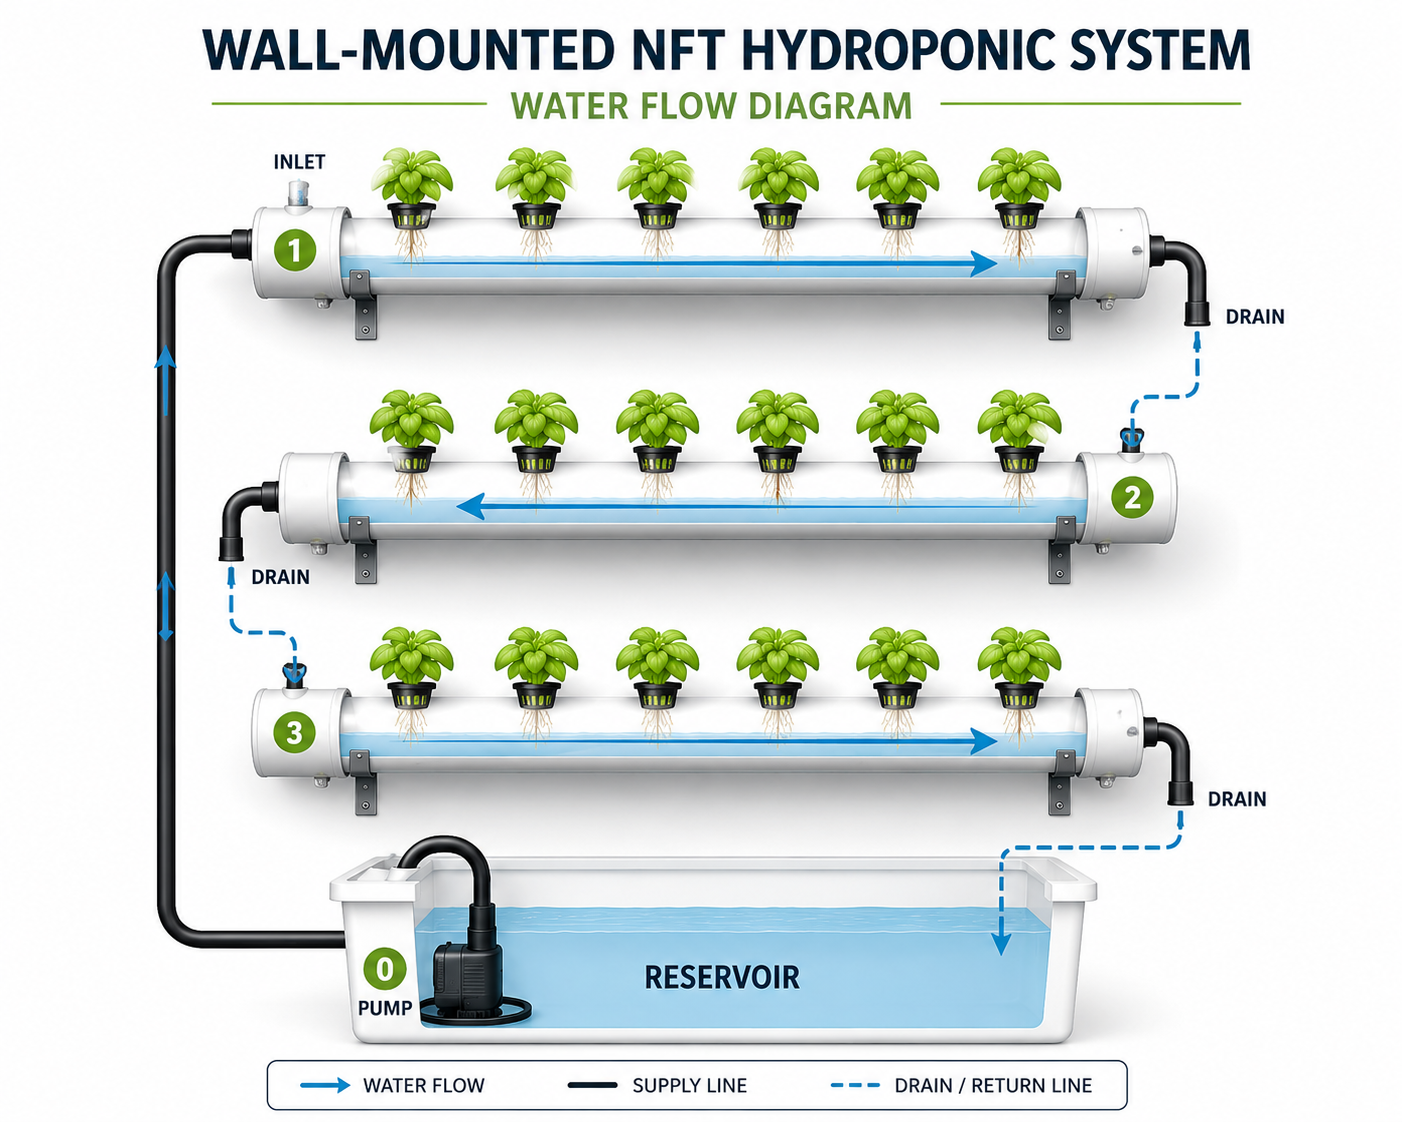
A submersible pump in the base reservoir pushes nutrient solution up through a main supply line to the inlet grommet of the top pipe. Water flows as a thin film along the bottom of the pipe, over plant roots in net pots, and exits through a drain grommet at the far end. A short connector tube carries water from that drain grommet to the inlet grommet of the pipe below, creating a zigzag circuit down all rows. The bottom pipe drains back into the reservoir through a return tube.
Each pipe slopes ¼ inch per foot toward the drain end so the film moves steadily without pooling. The University of Arizona Controlled Environment Agriculture Center identifies consistent slope and flow rate as the two most critical variables in NFT channel design. Target flow is 1 to 2 liters per minute per channel. The pump runs 24/7, the thin film dries within 45 minutes of pump failure and roots begin to stress immediately.
Which Wall Should You Choose?
| Wall Orientation | Rating | Notes |
|---|---|---|
| South-facing | âââââ | Maximum sun all day, best choice for all crops |
| East-facing | ââââ | Strong morning sun, great for herbs and lettuce |
| West-facing | âââ | Afternoon sun only, works for heat-tolerant crops |
| North-facing | â | Too little direct sun for most food crops |
If your available wall does not face south, mount a mylar reflective sheet on the opposite wall to bounce additional light onto the shaded side of plants.
What Do You Need to Know Before You Build?
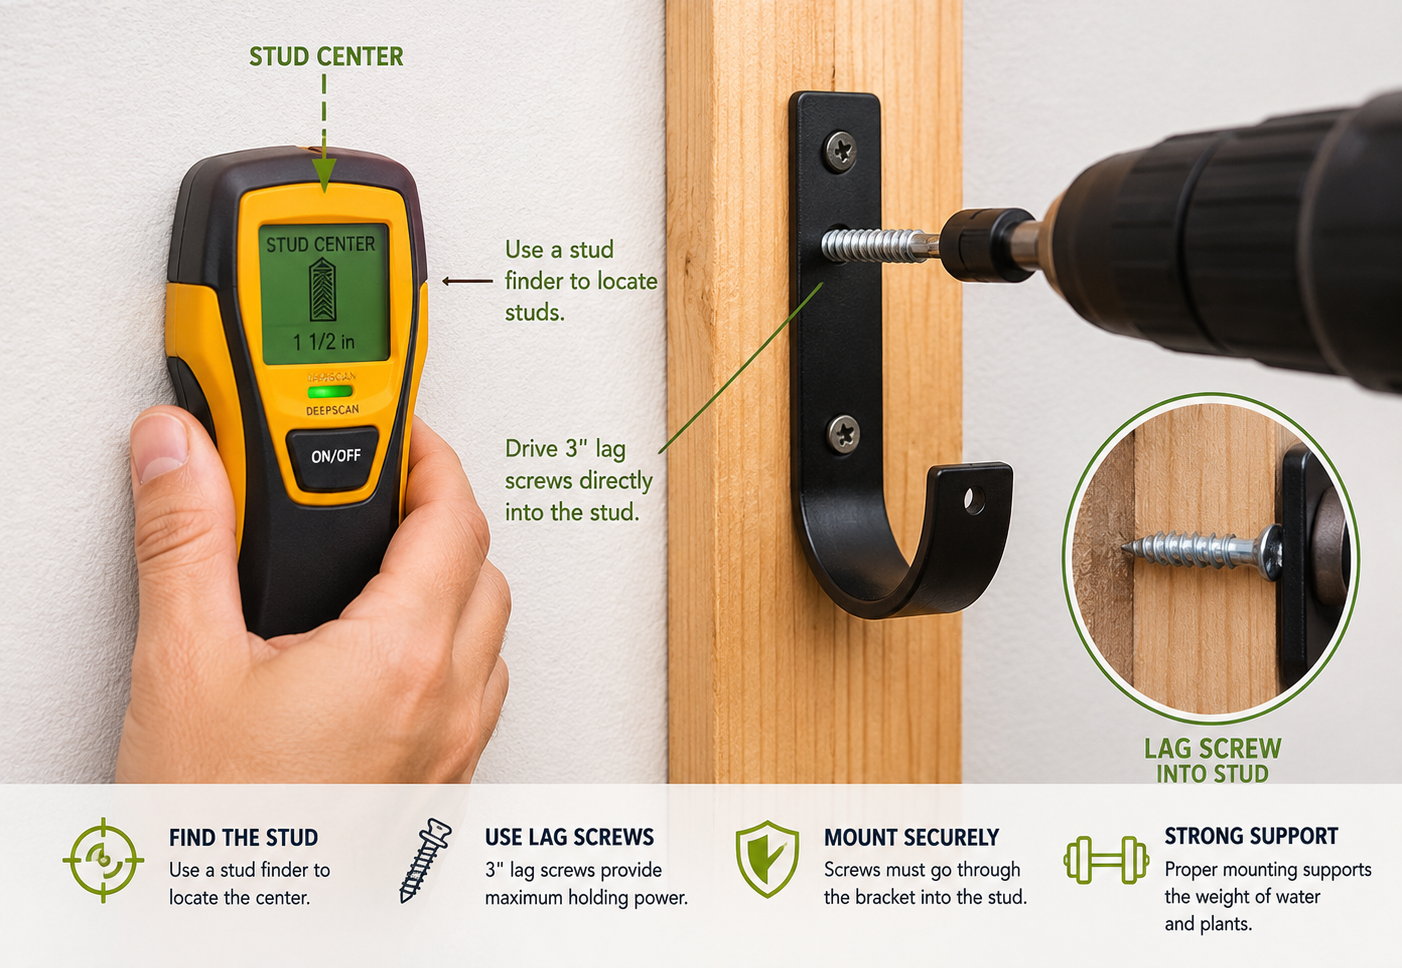
Structural load. Each filled pipe weighs 15 to 20 lbs. A 4-row system puts 60 to 80 lbs on your wall. Always use 3-inch lag screws driven into wall studs, never drywall anchors, which fail under dynamic water load. For brick or concrete, use concrete sleeve anchors rated 75 lbs minimum per anchor point.
Maintenance access. Leave 4 inches between the pipes and the wall surface. Without this gap, you cannot reach behind pipes to clean root debris between grow cycles.
How Do You Build It Step by Step?
Step 1: Find Studs and Mount Brackets
Materials: Stud finder, pencil, drill, heavy-duty J-hooks or 6–8 inch metal shelf brackets, 3-inch lag screws (2 per bracket).
Mount the bottom pipe 18 to 24 inches from the ground. Space rows 12 to 15 inches apart vertically. Use a stud finder to locate studs. Mount one bracket per pipe end plus one center support for 4-foot pipes. Drive lag screws into studs only, never into drywall between studs.
Step 2: Cut and Drill PVC Pipes
Materials: 4-inch white Schedule 40 PVC pipe (4 feet per row), 4-inch PVC end caps, PVC primer and cement, drill with 2-inch hole saw and ½-inch spade bit, measuring tape, marker, sandpaper (120 grit), ½-inch barbed grommets (2 per pipe), U-shaped pipe straps.
Cut all pipes to 4 feet. Mark net pot holes every 8 inches along the top face starting 4 inches from one end. Drill with the 2-inch hole saw. Sand all rough edges.
Cement an end cap on both ends. Let cure 30 minutes. Once cured, drill one ½-inch drain hole on the drain-end cap face, 0.5 inches above the bottom edge, this maintains the thin film without flooding. On the opposite end cap, drill one ½-inch inlet hole near the top edge. Insert one barbed grommet into each hole.
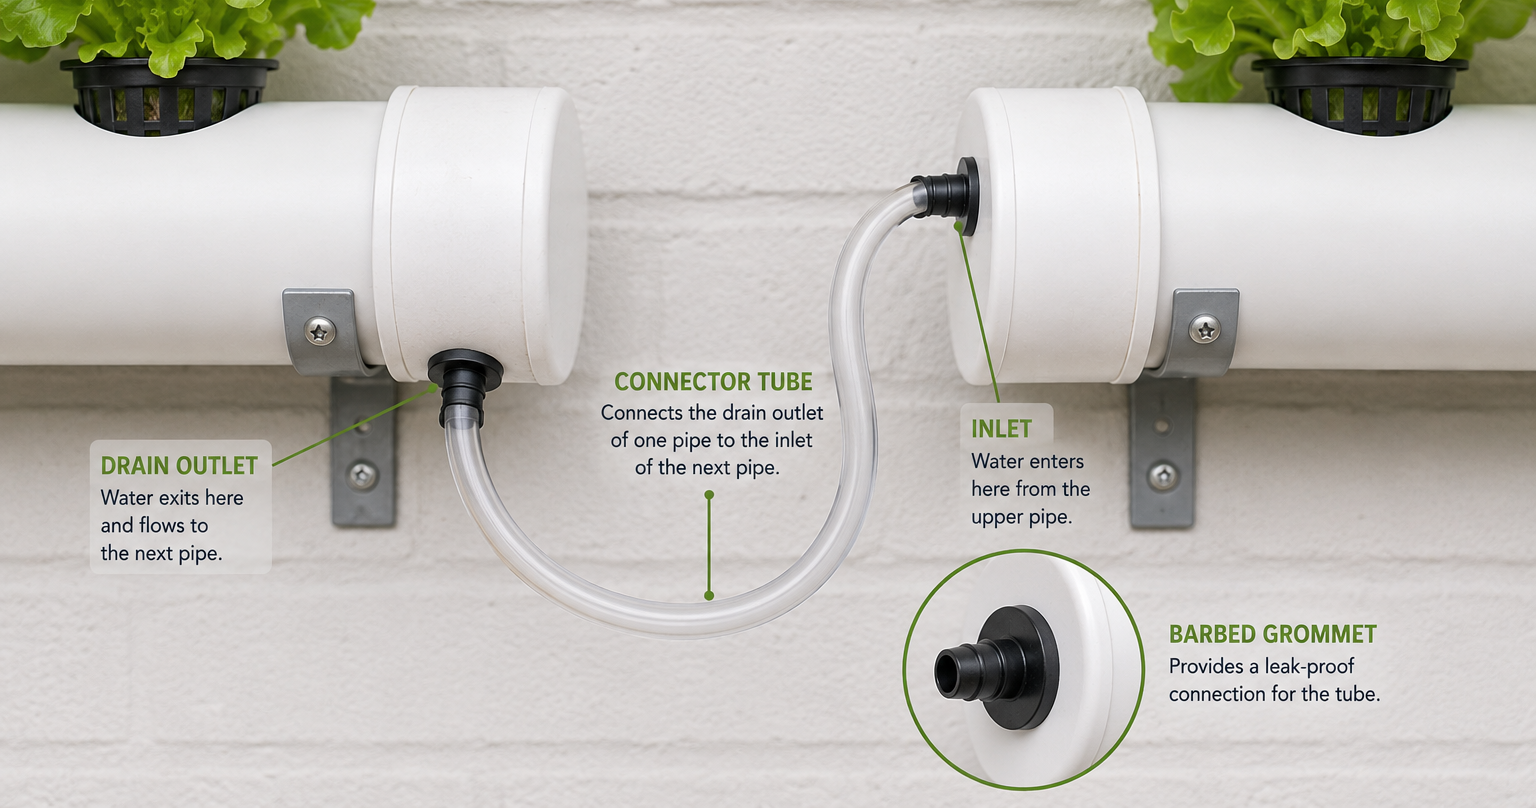
The top pipe only: its inlet grommet connects directly to the main pump supply line. All other pipes receive water from the pipe above via a short connector tube running grommet-to-grommet. Secure each pipe to its brackets with U-shaped pipe straps.
Step 3: Set the Slope
Materials: Bubble level (torpedo level), wooden shims.
Target slope: ¼ inch per foot. On a 4-foot pipe, the drain end sits 1 inch lower than the inlet end. Place a bubble level on each pipe. Slide shims under the inlet bracket until the slope is correct. Mark bracket position before driving screws permanently. Check every pipe individually, never assume a wall is level.
Step 4: Plumb the Zigzag Flow
Materials: ½-inch vinyl tubing, submersible pump (400 GPH minimum, 8-foot head height for a 4-row system), 20-gallon minimum black opaque reservoir, cable clips.
Cut connector tubes approximately 8 inches each. Connect the drain grommet of Pipe 1 to the inlet grommet of Pipe 2 using vinyl tubing. Because Pipe 2 slopes in the opposite direction, its inlet grommet is on the far end directly below Pipe 1’s drain. Repeat down all rows.
Run a return tube from the bottom pipe’s drain grommet into the reservoir through a hole in the lid. Connect the pump outlet to the main supply line running up to the top pipe’s inlet grommet. Secure all tubing to the wall with cable clips.
How Do You Set Up for the First Run?
Fill the reservoir with plain water and run the pump for 20 minutes. Watch for drips at every grommet and check that flow on each pipe is steady, water should move without pooling or rushing. Fix all leaks before adding nutrients.
Once confirmed leak-free, drain, refill with nutrient solution, and adjust to pH 5.8 to 6.3 and EC 1.2 to 2.0 mS/cm for leafy greens and herbs, as outlined in the Oklahoma State University EC and pH guide for hydroponics. For pH management and ongoing solution changes, see pH and nutrients for beginners. For a full reservoir maintenance routine, see hydroponic reservoir maintenance tips.
What Are the Most Common Build Mistakes?
Drywall anchors. These fail under dynamic water load. Always lag screw into studs. For brick or concrete, use sleeve anchors rated 75 lbs minimum.
Pipes flush against the wall. Keep 4 inches of clearance so you can reach behind pipes to clean root debris between grow cycles.
Wrong slope. Always use a bubble level. Eye-measuring a slope is never accurate enough for NFT, even a half-degree error causes pooling or runoff.
Roots blocking drain tubes. Trim roots monthly. The drain hole sits 0.5 inches above the end cap bottom edge to maintain the thin film, but long roots reach the drain and reduce flow over time.
Pump head height too low. Match the pump spec to the actual mounting height of the top pipe plus a 20% margin. A pump rated for exactly 4 feet will struggle once there is any flow resistance in the tubing.
What Should Northern Growers Know About Winter?
If you are in USDA Hardiness Zone 6 or colder, water left inside outdoor PVC pipes will freeze and crack them when temperatures drop below 32°F (0°C). Research from Cornell’s Controlled Environment Agriculture program consistently points to freeze damage as one of the most common reasons outdoor NFT systems fail in their first year.
Before the first hard freeze each fall: drain all pipes completely, disconnect the pump, and store the system indoors or in a garage. Do not leave water in the system overnight once nighttime temperatures begin approaching freezing. Mark your local average first-freeze date and set a calendar reminder 2 weeks ahead.
What Grows Best in a Wall-Mounted NFT System?
| Plant | Rating | Notes |
|---|---|---|
| Lettuce | âââââ | Fastest harvest, most forgiving, ideal for all rows |
| Basil | âââââ | Thrives in NFT, harvest every 7 to 10 days |
| Mint | âââââ | Aggressive grower, give it its own row |
| Spinach | ââââ | Cool-season crop, bolt risk in summer heat |
| Cilantro | ââââ | Fast cycle, bolts quickly, stagger planting |
| Kale | ââââ | Slower growth but large yield per plant |
| Swiss Chard | âââ | Works well in lower rows with more root space |
| Cherry Tomato | ââ | Lower rows only, needs structural support |
For more on algae prevention in the pipes and reservoir, see hydroponic algae prevention. For EC and pH ranges by crop, see the best plants to grow hydroponically.
The Bottom Line
A wall-mounted NFT system delivers the highest plant density of any wall-based build. Three details determine whether it holds long-term: lag screws into studs for structural integrity, ¼-inch-per-foot slope on every pipe for consistent film flow, and 4 inches of clearance from the wall for maintenance access.
For an overview comparing all five vertical hydroponic system types by cost and space, see how to build a vertical hydroponic system at home.
Can I use 3-inch PVC instead of 4-inch for a wall-mounted NFT system?
Yes, but root volume is reduced and water flow becomes less forgiving. Four-inch Schedule 40 PVC is the standard choice because it gives leafy greens more room for root development while maintaining a stable nutrient film.
How many plants does a 4-row wall NFT system hold?
A 4-row system with 4-foot pipes and net pots spaced 8 inches apart holds 24 plants, 6 per pipe. Spacing at 6 inches increases capacity to 32 plants but reduces root space per plant, best for compact varieties like butterhead lettuce and herbs.
Can I mount this system on a wood fence instead of a wall?
Yes, if the fence posts are structural and set in concrete. Fence boards alone cannot hold the load, brackets must attach to posts, not boards. Use exterior-grade hardware to prevent rust.
What plants grow best in a wall-mounted NFT system?
Lettuce, spinach, basil, mint, cilantro, and arugula are the most reliable. Cherry tomatoes work in lower rows where the bracket structure supports the additional weight. Avoid large root vegetables and heavy fruiting plants in upper rows.
How do I prevent algae in NFT pipes?
Make sure net pots fit snugly so no light enters the pipe interior. Wrap any clear vinyl tubing in black electrical tape. Keep the reservoir lid fully sealed. Algae cannot grow without light, eliminate light access and it cannot establish.
How often should I clean the pipes?
Wipe the interior of each pipe at every grow cycle change using a long bottle brush and plain warm water. Between cycles, circulate a diluted hydrogen peroxide solution (3% concentration, 1 cup per gallon) through the system for 20 minutes before a full freshwater flush.
Sources (3)
- University of Arizona, Controlled Environment Agriculture Center, retrieved 2026-06-28, https://ceac.arizona.edu/
- Oklahoma State University Extension, Electrical Conductivity and pH Guide for Hydroponics, retrieved 2026-06-28, https://extension.okstate.edu/fact-sheets/electrical-conductivity-and-ph-guide-for-hydroponics.html
- Cornell University, Controlled Environment Agriculture, retrieved 2026-06-28, https://cea.cals.cornell.edu/